Well, not really, but I am going to take a little vacation from the blog for the next month or so. We have a lot of plans for the month of August, including a two week road trip that we leave for in just a few days. I may check in here and there, but mostly I'll be enjoying the company of my two favorite people and soaking in the end of summer. Hope everyone has a great August and I'll see you in September with some fun new stuff.

July 26, 2011
July 22, 2011
Photo Friday
We're at my parent's house this weekend and have been looking through old pictures. I don't know about you, but I love to do this. So for today I leave you with a favorite picture of my grandpa and me.
Happy weekend!

Happy weekend!

July 21, 2011
Easy Made Invitations
Have you visited Easy Made Invitations? It is a site right up my alley. Homemade, beautiful invites for all occasions. Lindsay, the very talented lady behind the site, is here today to share how she does it. If you haven't, head over to her site and check her out. It is full of creative new ideas for fun invitations.
Hi! I'm Lindsay...I'm a mom, a wife and I have a passion for making homemade invitations! I love the design and creativity that goes into making a great invitation!
Homemade invitations add a practical, personal and fun touch to any occasion! And, contrary to belief, they're easy! All your guests are sure to love receiving a fantastic homemade invitation when they're invited to your party, shower or any celebration!

I just finished making this fun, trendy invitation for a baby shower. It could also double as a bridal shower invitation or a birthday invitation just by changing the text.

I was inspired to make this invitation just by finding this great ribbon. I loved the colors! The lime green and black are super trendy and look great together!

Finding coordinating paper was the easy part! I just picked the same colors that were in the ribbon.
I knew that I wanted the ribbon to be the focal point of the invitation, so I made sure that it was used more as a layer rather than just a finishing touch. I also made a smaller text sheet than usual but made a more elegant template for the sheet rather than just a square or rectangle shape.
For the invitation size, I used a standard 8-1/2"x 11" black cardstock and cut it down to a size of 6"x 6" which actually gave me two invitations for every sheet cut. Using this size of invitation will require a larger envelope size and possibly an additional stamp. The standard greeting card envelope is 5-3/4"x 8-3/4", so if you would rather not purchase a larger size of envelope, then make your overall size 5-1/2"x 5-1/2" to keep it square or 5-1/2"x 8-1/2" for a horizontal layout. Or, you could always make your own envelope too!
For the next layer I cut the green paper to a size of 5-3/4"x 5-3/4" to leave a 1/8" reveal of black. I usually use a 1/4" reveal on my invitations, but the black would have been too bold in this situation for a larger reveal.
For the text layout I just used my printshop program to decide how big and what the text looked like. I came up with this template for the text layer by drawing it freehand until I liked it and then I cut it out. I printed a couple different text blocks onto the cardstock and used the template I made to trace around each of the text blocks. Then I cut them out.
To get the black shadow around the text layer, I adhered the white text cardstock to another piece of black cardstock and cut it out leaving a little less than 1/8" of black showing.

The assembly process is easy! Just take a piece of the ribbon and cut it 8" long. Wrap it around the green cardstock and tape it on the back. Using scrapbook mounting squares, attach the green cardstock to the black and then attach the text sheet to the ribbon and green layer.

Your done! What a beautiful invitation! Everyone is definitely going to think that you had these custom made...and you can tell them you did...by you!
-Lindsay
www.easymadeinvitations.com
Thanks Lindsay! The invitation is beautiful.
July 20, 2011
Doll Tutorial: Part III
Part III of the doll tutorial, yay! The last few steps to a finished doll. Here are part I and part II.
First you'll need to print out the doll pattern. Click on the image and print it out. It should fit on an 8.5"x11" piece of paper. (Please let me know if this doesn't work... it was the best I could come up with as I failed to figure out how to add a pdf into the post.)
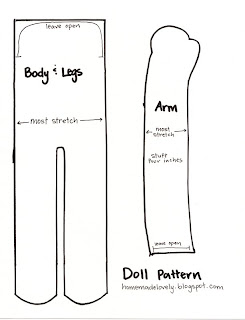
Out of the doll fabric cut 2 of the Body and Legs section. Pin them together and sew with a scant 1/4 seam, leave the top open where indicated on the pattern. Cut 4 arms out of the doll fabric, pin two together and sew. Turn both the arms and the body/legs right side out.
Tightly stuff the first 4" of the arms with wool batting.

Turn the head over and tack the arms to the should area. You will have excess fabric to cut off.

Next, stuff the body and legs. Start by tightly stuffing the feet and then place a safety pin across the ankle. Continue stuffing up the leg and place another safety pin across the hip area. Stuff the rest of the body area.

 Insert the head piece with the arms attached into the top of the body section. Pin together the shoulders. Stitch the body to the neck right above the string, so it is hidden, using a ladder stitch.


After the neck is stitched closed, stitch the shoulders leaving just an opening at the arms. Add more stuffing through the opening at the arms until the doll is nice and full and fluffy. After the body is completely stuff use the ladder stitch to stitch the armholes closed.


Now bend up the foot and stitch the top to the front of the leg. Don't stitch all the way through the leg.

Stitch across the hips going completely through the leg. And you have a finished doll.

I used this tutorial from Starry Sheep for the hair, but if you do a search for doll hair there are a lot of options.
Hopefully this all makes sense and will be useful. If you make one, send a picture my way; I would love to see your end result.
First you'll need to print out the doll pattern. Click on the image and print it out. It should fit on an 8.5"x11" piece of paper. (Please let me know if this doesn't work... it was the best I could come up with as I failed to figure out how to add a pdf into the post.)

Out of the doll fabric cut 2 of the Body and Legs section. Pin them together and sew with a scant 1/4 seam, leave the top open where indicated on the pattern. Cut 4 arms out of the doll fabric, pin two together and sew. Turn both the arms and the body/legs right side out.
Tightly stuff the first 4" of the arms with wool batting.

Turn the head over and tack the arms to the should area. You will have excess fabric to cut off.

Next, stuff the body and legs. Start by tightly stuffing the feet and then place a safety pin across the ankle. Continue stuffing up the leg and place another safety pin across the hip area. Stuff the rest of the body area.


After the neck is stitched closed, stitch the shoulders leaving just an opening at the arms. Add more stuffing through the opening at the arms until the doll is nice and full and fluffy. After the body is completely stuff use the ladder stitch to stitch the armholes closed.


Now bend up the foot and stitch the top to the front of the leg. Don't stitch all the way through the leg.

Stitch across the hips going completely through the leg. And you have a finished doll.

I used this tutorial from Starry Sheep for the hair, but if you do a search for doll hair there are a lot of options.
Hopefully this all makes sense and will be useful. If you make one, send a picture my way; I would love to see your end result.
July 19, 2011
Doll Tutorial: Part II

Here we go, part II of the doll tutorial. In case you missed it here is part I. After today the head will be finished, yippee. The head is definitely the most time consuming part of the whole thing.
As a reminder this is what you should have after part I.

Ok, here we go...
Cut a piece of string 24" long and wrap it around the middle of the head twice to create the eye line. Tie it off where the ear would be.

Cut another piece of string 24" and wrap it twice around the head from chin to the top, in front of the shoulder. Tie off the string at the top of the head.

Using a needle and thread tack the points where the strings intersect at the side of the head. Stitch several times to insure they are secure.

After the eye line and head strings are attached pull down the eye line string in the back of the head to the neckline.

Cut a piece of the doll fabric approximately 9"x8". With the maximum stretch being on the 8" side. I don't have a picture of this, but hopefully it will make sense. Fold the fabric in half so it is 9"x4" and sew up the long side creating a tube. Insert the inner head into the tube making sure the seam is going up the back of the head.

Move the head so it is about an inch from the top of the tube. Pull the fabric over the top of the head and stitch in place.

Once the fabric is stitched to the top of the head, pull the fabric down tightly and cut off any excess. Stitch the bottom together below the shoulders, making sure a few stitches go through the shoulders to secure it. Again, this doesn't have to be pretty, it will be covered up.


Cut another piece of string and wrap it twice around the neck. Pull very tightly and tie it off in back. Try to have as few wrinkles in the neck as possible. You can also see in this picture where I marked the spot for the eyes and mouth. They form a triangle and are all about 1" away from each other.

Embroider both the eyes and the mouth going all the way through the dolls head and tying off the thread in back, which will later be covered by hair.

And now you have a completed doll's head, minus the hair. You could also add a little blush to the cheeks to give them a little color.

Next step, the doll's body and attaching it to the head. Stay tuned for part III tomorrow.
July 18, 2011
Doll Tutorial: Part I

I've split the doll tutorial up into three parts. It isn't that making one of these dolls is difficult, in fact I thought the process was a lot of fun, but there are a lot of little steps and I want to make sure it is clear. Part I and II will cover how to make the head and part III will be the body and putting the doll together.
Here is what you'll need:
Wool Batting - The wool batting doesn't squish down over time like polyester or cotton; JoAnns only sold it by the yard, I bought 12 inches and had extra.
One thin sock in a color similar to the doll's fabric color
1/4 yd Doll Fabric - Apparently there is something actually called doll fabric, JoAnns didn't have it. I bought a lightweight knit that didn't have a ton of stretch to it. It worked just fine.
Thread to match doll's fabric color
String
Embroidery Floss for Eyes and Mouth
Yarn for Hair
Doll Needles - These are extra long needles that really are necessary. They came in a pack of four and were just a couple of dollars.
Body Pattern - I will include this in part III of the tutorial
Start by taking strips of the wool batting and wrapping it around itself very tightly to form a ball. If yours is anything like mine at first it won't be very round, but don't worry, as you wrap more strips around it will start getting a nice round shape.

Continue wrapping until you have a ball that is between 9 and 10 inches in circumference.

Cut a 10" square of wool batting and tightly wrap it around the ball you formed, holding it tightly at the neck.


Stuff the batting-wrapped head into the sock and tightly tie it off as close to the head as you can.


Tuck the extra batting into the open end of the sock and tie off. This does not need to be nearly as firm as the head.

Tuck the tail of the sock back into itself, pulling the sock to form a little pouch and stitch. This doesn't need to be pretty, it will be hidden inside of the doll.


And this is what your head should look like.
Overwhelmed? I hope not. I know it seems long, but it really is straightforward, there are just a lot of small steps. Tomorrow I'll show you how to finish the head.
July 15, 2011
Photo Friday
We are in the middle of a mini-vacation. Bryce has three full days off. We are about to head out the door to the Farmer's Market, but first I thought I would share my favorite photo from the week. Who knows, maybe this will become a weekly event around here.
Have a great weekend! I'll be back next week with the tutorial for the doll and a guest post from Lindsay, the lovely lady over at Easy Made Invitations. If you haven't already checked out her site you should, her invitations are beautiful.
 |
| Dinner on Thursday. Audrey absolutely refused to eat unless she was wearing her sunglasses. She is a diva. |
Have a great weekend! I'll be back next week with the tutorial for the doll and a guest post from Lindsay, the lovely lady over at Easy Made Invitations. If you haven't already checked out her site you should, her invitations are beautiful.
July 13, 2011
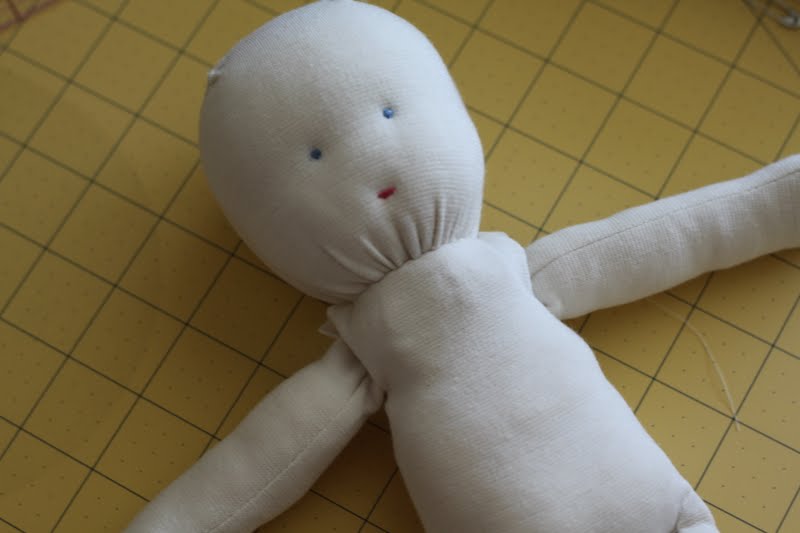
Audrey's Doll
I was never big into dolls growing up. If I'm remembering correctly my sister and I each had a Cabbage Patch doll for awhile, but mostly we were more into Legos and playing practical jokes on our little brother than playing with the dolls. Nonetheless, I decided it was time Audrey had a doll of her own, even if she ends up being just as much of a tomboy as her mom.

I made the doll using the Waldorf style and created my own pattern. I'm super happy with how she turned out. I'm still deciding if I want to make her cheeks a little rosy. Thoughts?

Also she obviously needs clothes, but when I sat down to make her something I got completely overwhelmed. It has been so long since I've sewn clothes I feel like I don't even know where to start. It's like riding a bike though, right? I just need to do it.
Clothes or not, Audrey seems to be quite smitten. She already has given her plenty of hugs and kisses.
 |
| Please ignore the blurriness, it was the best I could do. |
Update: Here is part I, part II, and part III of the tutorial. Don't be scared by the three part tutorial, it is quite simple.
Posted at:
Made By You Mondays at Skip To My Lou
Get Your Craft On at Today's Creative Blog
We Did It! Wednesday at Sew Much Ado
Get Your Craft On at Today's Creative Blog
We Did It! Wednesday at Sew Much Ado
July 12, 2011
Lemony Chicken Piccata with Prosciutto

I've often heard people say that everything is better with bacon and let's be honest, it's completely true. In our house we feel similarly about Prosciutto. That's why I couldn't help but add it to one of my all time favorite dishes, Chicken Piccata. It was incredible. I loved the lemony, briny sauce with the combination of the salty Prosciutto. Just thinking about this is making me so glad we have leftovers for tonight.
Lemony Chicken Piccata with Prosciutto
makes 2 very generous portions or you can cut each piece of chicken in half and make 4 more reasonably sized portions
2 chicken breasts
4 slices Prosciutto
1/2 cup flour
1 tablespoon olive oil
2 tablespoons butter
2/3 cup chicken stock
1/4 cup freshly squeezed lemon juice
2 heaping tablespoons capers with brine

Dredge chicken in flour and shake off excess. In a large skillet heat olive oil and 1 tablespoon butter. When the olive oil and butter begin to sizzle add chicken breast and cook for 3 minutes on each side or until browned. Remove chicken to plate.

Into pan add chicken stock, lemon juice, capers and brine, scraping the bottom of the pan to pick up all the brown bits. Check for seasoning.

Return chicken to pan and simmer for 5-10 minutes or until chicken is completely cooked through.

Remove chicken to platter making sure to remove toothpicks. Add remaining tablespoon of butter to pan and whisk until incorporated.

Pour sauce over chicken, serve, and enjoy!

We often use the extra sauce on pasta or mashed potatoes as a side and it is always excellent.
Posted at:
We Did It! Wednesday at Sew Much Ado
Subscribe to:
Posts (Atom)